

Your upstairs runs hotter mainly because warm air rises, then gets trapped by attic heat, leaky ducts, or a thermostat that is satisfied long before the second floor is. Start today with three checks: swap the air filter if it’s dirty, open every upstairs supply register, and flip the fan setting from AUTO to ON for a few hours. If several rooms upstairs still feel stagnant or you find damaged ductwork, that’s your signal to bring in a professional.
TL;DR:
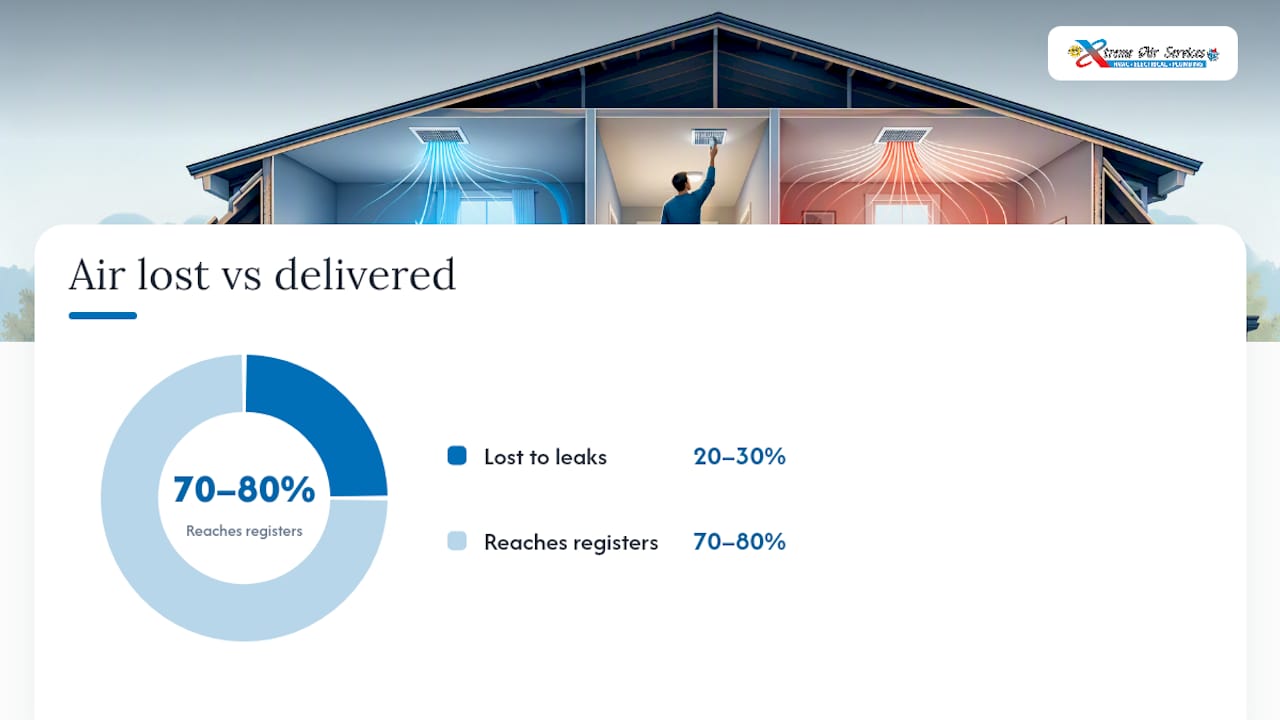
- Leaky or improperly insulated ducts through the attic can waste up to 30 percent of cooled air, reducing upstairs comfort significantly.
- A thermostat placed downstairs may satisfy early, causing the system to shut off before upstairs reaches the desired temperature.
- Upgrading attic insulation to at least R-49 and sealing leaks can markedly lower radiant heat transfer into upstairs rooms.
- Running the fan continuously and opening upstairs vents may improve circulation but often cannot resolve duct leaks or attic heat issues alone.
- When DIY measures fail, professional diagnostics—including airflow testing and duct sealing—are essential for identifying and fixing persistent upstairs cooling problems.
Table of Contents
- What Causes Uneven Cooling Upstairs
- Quick DIY Checklist for Uneven Cooling Upstairs
- How to Diagnose Which Upstairs Rooms Need Help
- Does Attic Insulation Really Affect Upstairs Temperature?
- Fixing Ductwork Problems That Cause Uneven Cooling
- Should You Add Zoning or a Ductless Mini-Split?
- When Should You Call an HVAC Professional?
- How Professionals Diagnose Persistent Upstairs Heat
- Schedule an Upstairs Cooling Inspection
- A Note on Prioritizing Fixes
- Sources
- FAQ
What Causes Uneven Cooling Upstairs
Physics is working against your second floor before your HVAC system even turns on. Hot air is lighter than cool air, so it naturally rises and pools near the ceiling and top floor, a phenomenon HVAC techs call the stack effect. Add a sun-baked attic radiating heat downward through the ceiling drywall, and your upstairs starts fighting a losing battle by early afternoon. That heat often lingers into the evening too, since roofing materials and attic insulation release stored heat for hours after the sun goes down.
Several other culprits compound the problem:
- Thermostat location: a thermostat mounted downstairs, often in a naturally cooler hallway, satisfies its set temperature and shuts off the system before the upstairs ever catches up.
- Duct issues: leaky, undersized, or poorly insulated ducts running through a hot attic lose cooled air before it reaches upstairs vents.
- Missing or blocked returns: without enough return air pathways upstairs, cooled air can’t circulate efficiently, and pressure imbalances make the system work harder for less benefit.
- Room-level blockers: closed bedroom doors, furniture blocking vents, and west-facing windows with no shading all add localized heat that a central system struggles to overcome.
One hot bedroom points to a local issue, like a blocked vent or bad window placement. A whole hot floor points upstream to ducts, insulation, or thermostat placement.
Quick DIY Checklist for Uneven Cooling Upstairs
Before calling anyone, run through this sequence. Each step takes minutes and rules out the cheapest, most common culprits first.
- Check the air filter. A clogged filter restricts airflow system-wide, and upstairs rooms, being farthest from the air handler, feel it first. Replace it if you can’t see light through it.
- Open every upstairs register fully. It sounds obvious, but furniture, rugs, and curtains block more vents than homeowners realize.
- Switch the fan setting from AUTO to ON. This keeps air moving between cooling cycles instead of letting it stall, which helps distribute the cool air that’s already in the ducts.
- Compare airflow room to room. Hold your hand near each vent, or use an inexpensive vane anemometer if you have one. Weak or absent airflow at an upstairs vent while downstairs vents blow strong is a clear duct or damper problem.
- Cut solar gain immediately. Close blinds on any window that gets direct afternoon sun, and consider reflective or blackout shades on the worst offenders.
- Try a night purge when outdoor temperatures drop. Opening upstairs windows for an hour or two after sunset, if your climate cools off at night, lets accumulated heat escape before the next day’s cycle starts.
Pro Tip: Run the fan-on trick for one full afternoon and note whether the upstairs feels noticeably better by evening. If it does, your issue is mostly circulation. If it doesn’t budge, you’re likely dealing with duct loss or attic heat, and DIY fixes alone won’t solve it.
How to Diagnose Which Upstairs Rooms Need Help
A cheap thermometer and a little patience will tell you more than guessing ever will. Test in late afternoon, when solar heat gain peaks, and again right after a cooling cycle finishes, to see how much the room actually dropped.
- Compare register temperature to room temperature. A healthy system delivers air 15 to 20 degrees cooler than room temperature at the vent. A smaller gap suggests duct loss or a struggling system.
- Feel for weak airflow at upstairs vents. Weak flow with strong flow downstairs usually means a collapsed flex duct, a closed damper, or a leak somewhere in the attic run.
- Inspect visible ductwork in the attic. Look for disconnected joints, crushed sections, or insulation that’s fallen away from the metal or flex duct. Cold, damp spots on the duct exterior or a faint whistling sound both point to leaks.
- Test thermostat placement. Place a portable temperature sensor in the hottest upstairs room for a day and compare it to what the thermostat reads. A wide gap explains why the system keeps shutting off too early, a point Energy.gov’s thermostat guidance addresses directly.
Does Attic Insulation Really Affect Upstairs Temperature?
Yes, more than most homeowners expect. An attic can become extremely hot on a summer afternoon, and that heat radiates straight through the ceiling into the rooms below it. Energy.gov recommends attic insulation levels around R-49 in many climates, a target that older homes with 6 to 8 inches of blown-in insulation often fall well short of.
Homeowners can handle some of this themselves:
- Check for thin or compressed insulation, especially near the eaves where it tends to get pushed aside.
- Seal recessed light housings and plumbing penetrations, which act as chimneys pulling conditioned air upward.
- Weatherstrip the attic access hatch, a spot almost every home leaks through.
Blown-in insulation upgrades to hit that R-49 target, along with a proper soffit and ridge ventilation assessment, are jobs better left to a contractor who can measure existing R-value and airflow before recommending a fix.
Fixing Ductwork Problems That Cause Uneven Cooling
Ducts running through a hot, unconditioned attic are often the single biggest reason a second floor won’t cool evenly. Leaky or poorly connected ductwork can waste 20 to 30 percent of the air moving through the system, air you’re paying to cool that never reaches the register.
Homeowners can spot some of this without tools:
- Restricted or collapsed flexible ducts often show up as a sudden drop in airflow at one specific vent while nearby rooms cool fine.
- Visible tears, disconnected sections, or duct tape that’s peeling off (regular duct tape degrades in heat) are signs of a leak that needs attention.
- Small accessible leaks can be sealed with mastic or foil tape, both of which hold up far better than standard duct tape in attic heat.
Large leaks, buried joints, or anything requiring re-hanging or replacing duct sections calls for a professional, partly because proper sealing often pairs with a pressure test to confirm the fix worked.
Pro Tip: Never close downstairs vents to force more air upstairs. It feels intuitive, but it raises static pressure in the system, which can freeze the evaporator coil and cause a much bigger repair. If you need to redirect airflow, ask about dampers or HVAC system balancing instead.
Should You Add Zoning or a Ductless Mini-Split?
When basic maintenance and sealing don’t close the gap, the next step is adding targeted capacity rather than replacing the whole system. Two options come up most often for hot upstairs floors.
- Zoning systems divide your ductwork into sections with independent dampers and thermostats, so upstairs and downstairs can run on different schedules and temperatures. It’s a strong option when the ductwork itself is sound but the demand between floors is just too different for one thermostat to manage.
- Ductless mini-splits skip ducts entirely, delivering cooled air directly into a problem room or an addition that was never on the duct system to begin with. Energy.gov notes that mini-splits and zoning are both effective for hard-to-cool spaces, and SmarterHouse points out that mini-splits avoid duct losses altogether, which matters a lot in a leaky attic run.
- Adding a second system or upsizing becomes the answer when the house has simply outgrown its original HVAC capacity, often the case in additions or multi-story homes built in phases.
Expect some installation disruption either way, plus a modest bump in energy use if you’re now cooling two zones instead of one. A well-installed ductless mini-split typically lasts 15 to 20 years with routine filter cleaning.
When Should You Call an HVAC Professional?
Call a professional if the system short-cycles constantly, if three or more upstairs vents show weak airflow, or if you notice signs of a refrigerant issue like ice on the lines or warm air blowing from working vents. Those symptoms usually mean the fix is beyond filter swaps and blind-closing.
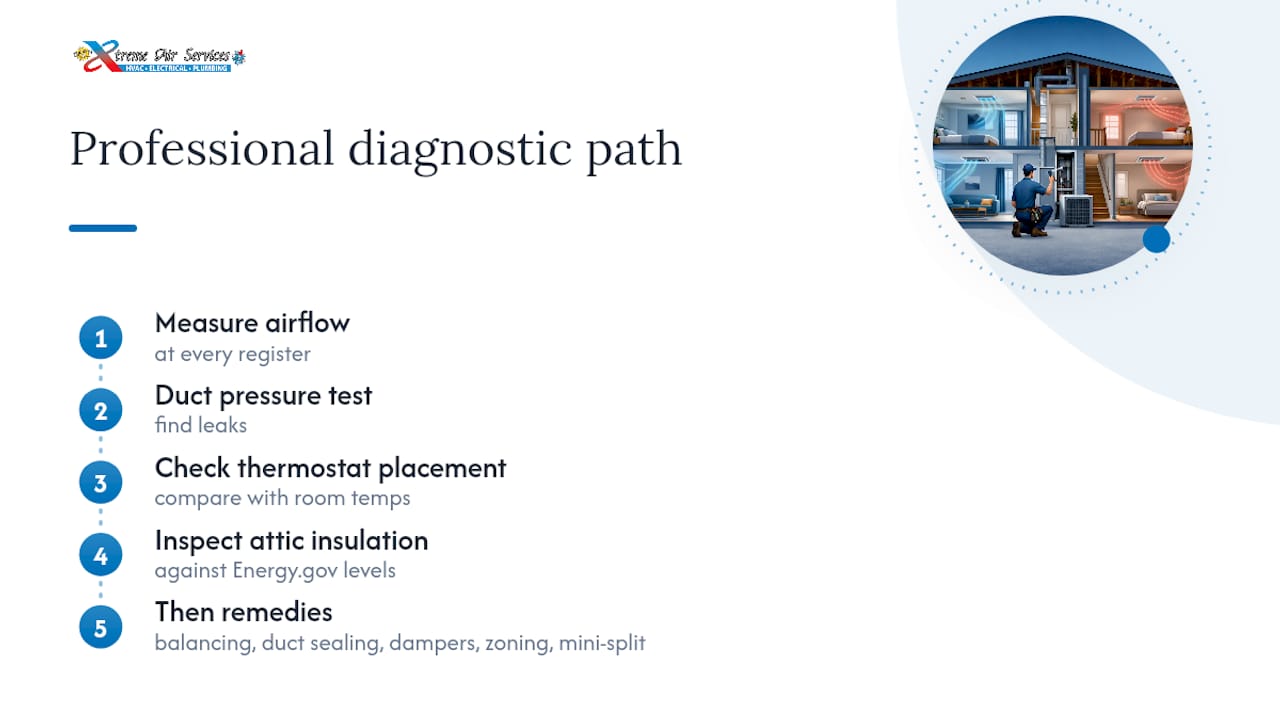
A proper visit typically includes airflow testing at each register, a duct pressurization test to pinpoint leaks, a check of thermostat placement and calibration, and a look at attic insulation and ventilation. Timelines vary by the size of the fix:
- Filter and register issues: same-day, often resolved in one visit.
- Duct sealing or insulation top-ups: 1 to 3 days.
- Zoning installation or a mini-split retrofit: 1 to 7 days, depending on scope.
Cost generally scales the same way, from a low-cost sealing job to a higher investment for zoning or a new mini-split system. A ductwork inspection is the fastest way to find out which category your home falls into before committing to a bigger project.
How Professionals Diagnose Persistent Upstairs Heat
When DIY fixes stall out, professionals follow a fairly consistent path: measure airflow at every register, pressure test the ducts for leaks, confirm thermostat placement against actual room temperatures, and check attic insulation against Energy.gov’s recommended levels. From there, the usual next steps are professional balancing, duct sealing, damper or zoning installation, or a mini-split for a room that’s never going to cool right off the main system.
Before hiring anyone, ask what diagnostics they’ll actually run, whether they’ll show you measured data (not just a guess), and what warranty covers the work. If interior door gaps or poor sealing around stairwells are adding to the airflow problem, improving door and envelope sealing can help too, especially in older homes with original doors and frames.
Schedule an Upstairs Cooling Inspection
Professional services handle the full range of fixes covered here, from HVAC system balancing and duct sealing to zoning installation and ductless mini-split setups for rooms that central air just can’t reach evenly. Rather than guessing which fix your home needs, a technician can measure airflow and duct performance directly and tell you whether the problem is sealing, balancing, or added capacity.

If your upstairs has felt hotter every summer and the DIY checklist above only bought you partial relief, it’s worth getting a real diagnosis instead of buying another window unit. Check out HVAC maintenance plans to keep your system running at full capacity year round, or schedule an inspection to find out exactly where your upstairs cooling is falling apart.
A Note on Prioritizing Fixes
Check airflow, filters, and shading first. Then move to attic and duct sealing. Save system upgrades for last. Cheap fixes often deliver the comfort gain homeowners expect from expensive ones.
— Xtreme
Sources
FAQ
Why is my upstairs so hot even with the AC on?
Warm air naturally rises and collects upstairs, and attic heat, leaky ducts, or a downstairs thermostat that shuts the system off too early all make it worse. Running the fan setting on ON instead of AUTO and checking your filter are the fastest first steps.
How do I fix uneven cooling in my house?
Start with filters, vents, and fan settings, then check for duct leaks and attic insulation gaps, since sealing ducts and hitting recommended attic R-values typically deliver the biggest improvement. If those steps don’t close the gap, zoning or a mini-split targets the remaining heat directly.
Why isn’t my upstairs cooling well?
The most common reasons are a thermostat located downstairs that satisfies too soon, ducts running through a hot attic that lose cooled air, and insufficient attic insulation letting radiant heat through the ceiling. A quick temperature check at the vent versus the room will tell you if duct loss is the issue.
How can I improve cooling upstairs?
Seal accessible duct leaks with mastic or foil tape, upgrade attic insulation toward the R-49 range Energy.gov recommends, and consider a ductless mini-split or zoning system if one or two rooms stay hot no matter what. Closing downstairs vents to force air up is not the answer. It can freeze your evaporator coil instead.